Installation manual
Step-by-step installation
After the completion of the installation, double-click on the icon of the downloaded program, starting the installation process of the program in your computer. Installation of the AccountStudio demo is launched, installing the necessary programs and configuring your computer so that it would be able to use the AccountStudio business software safely.
In order to install the software, the user has to be logged into the computer as the administrator.

When you’re sure that you want to install the program, click the button ‘Edasi’ in the first window. The button ‘Loobu’ enables cancelling the installation. Respective instructions are also displayed in the new window.
When you’ve decided to try the program, a new window (Image 2) is displayed, where the location of installing the program in your computer is determined. The default location is the Program Files folder on Disk C (or another program disk in your computer) where a new subfolder ‘Vesiir’ is created.
If you wish to choose the folder yourself, click the button ‘Sirvi’ and indicate the location to install the program. To cancel, click the button ‘Loobu’.
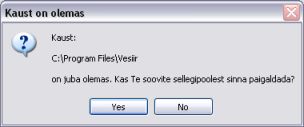
If there already is a folder with the same name in your computer, a warning is displayed asking if you’re sure to install the programs in the folder (Image 3). By clicking ‘Yes’, the files are installed in the folder; by clicking ‘No’, the previous window (Image 2) is displayed and you’re asked to choose a new destination.
Installation will continue after clicking ‘Yes’ – a window is displayed where you have to choose the components to install. In total, five different programs are installed in the user’s computer. Two of these (Zebedee security channel and Firebird SQL client) are mandatory to ensure that using the program is safe and there is access to the Vesiir server. The other three are program modules Finance, Warehouse and Wages (Image 4).
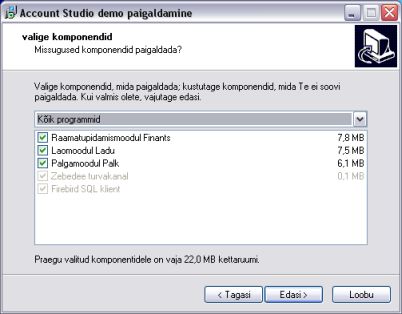
The user’s task is to select the modules to try out and tick the respective squares (checking the selections). By continuing, the selected modules are installed.
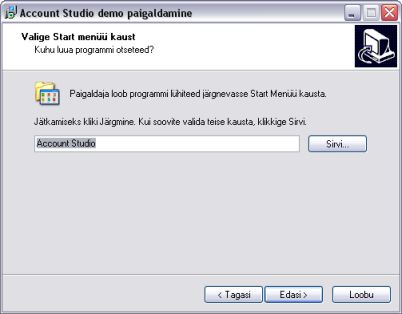
A shortcut folder for launching the program modules is then generated in the Start menu. The default name of the folder is ‘Vesiir’, but you can change it if so desired (Image 5). If you don’t want to change the name, click the button ‘Edasi’.
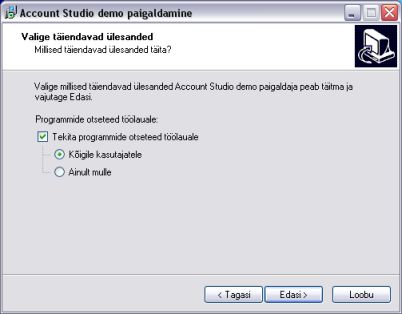
In the next window (Image 6), you are asked to decide whether to create a shortcut to launch the program on the desktop (by checking or not checking the box). If you want to create a shortcut, you’ll have to decide whether to create the program shortcut for all the users on the computer (provided that other people also use the computer) or only for you (check the selection). Once you’ve made your selection, click ‘Edasi’.
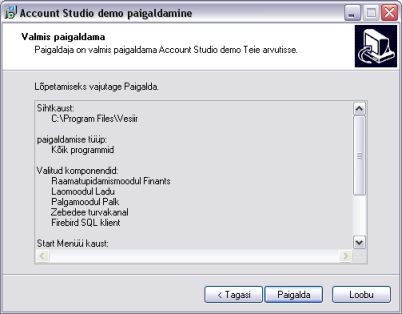
This completes everything necessary for the installation and your computer will proceed by itself. You are first displayed the summary of your selections (Image 7), where you can review them once more.
If you want to change something, this is your last chance to go back to the stage where you want to make the correction. To do this, click the button ‘Tagasi’ until the window for the respective correction is displayed.
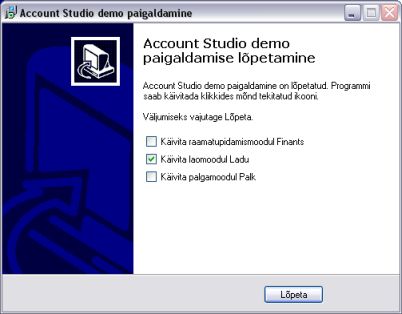
After checking and accepting the settings, click the button ‘Paigalda’. Installation of the components commences, and the course of installation is displayed in the next window. A window (Image 8) is displayed upon the completion of the installation, notifying you of the completion. You can specify in the window that the installed module(s) is (are) launched immediately when clicking the button ‘Lõpeta’.
Launching our programs for the first time
If your Windows Firewall is switched on or you’re using another antivirus/firewall software, you’ll have to allow the components to connect to the internet when launching our programs for the first time. Image 9 displays a security warning in case of a Windows XP firewall. Here, you would have to choose either ‘Unblock’ or, if you’re not fully sure about your selection, ‘Ask me later’.

See the warnings of some of the most common antivirus and security software here.
Logging into the program
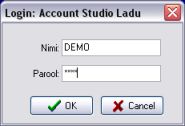
Enter the username and password in the log in dialogue (Image 10) in order to use the program.